Amateur telescope making (ATM) is a rewarding pursuit that combines scientific understanding with hands-on craftsmanship. Among the various telescope designs available, the Newtonian Reflector Telescope is one of the most popular choices for amateur builders due to its relatively simple design, powerful light-gathering ability, and cost-effectiveness. This article provides a comprehensive guide to designing and building a Newtonian reflector telescope, covering everything from optical principles to mirror construction, mechanical assembly, and alignment techniques.
Understanding the Newtonian Reflector Telescope Design
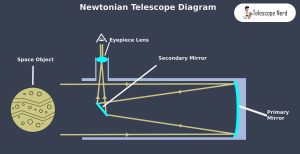
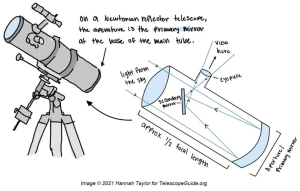
Invented by Sir Isaac Newton in the 17th century, the Newtonian reflector uses a parabolic primary mirror to collect and focus light, which is then reflected by a flat secondary mirror into the eyepiece. The key components include:
- Primary Mirror: A parabolic mirror that gathers light and brings it to a focus.
- Secondary Mirror: A flat mirror set at a 45-degree angle to direct the light to the eyepiece.
- Optical Tube Assembly (OTA): The structure that holds the mirrors and eyepiece.
- Focuser: A mechanism for holding and adjusting the eyepiece.
- Mount: A structure that supports the telescope and allows it to move smoothly.
Planning Your Newtonian Reflector Telescope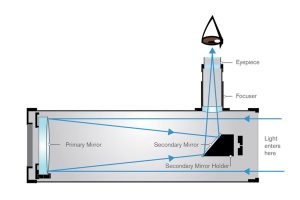
Before construction begins, you must decide on the specifications of your telescope. Important parameters include:
- Aperture: The diameter of the primary mirror. Common sizes for amateur telescopes range from 6 to 12 inches.
- Focal Length: The distance from the mirror to the focal point. A longer focal length provides higher magnification but results in a longer tube.
- Focal Ratio (f/number): The ratio of focal length to aperture (e.g., f/8). Lower f/numbers provide wider fields of view.
For beginners, an 8-inch mirror with an f/6 focal ratio strikes a good balance between performance and ease of construction.
Grinding and Polishing the Primary Mirror
One of the most challenging yet rewarding aspects of building a Newtonian reflector is creating the primary mirror. This involves grinding, polishing, and figuring the mirror surface to achieve the desired parabolic shape.
Materials Needed:
- A glass blank (Pyrex or plate glass)
- A tool (another glass disk or tile tool)
- Carborundum (silicon carbide) grits of various sizes
- Cerium oxide or rouge for polishing
- Pitch lap for polishing
- Foucault tester for measurement
Grinding Process:
- Rough Grinding: Use coarse grit (e.g., 60-80) to shape the mirror to the desired curvature.
- Fine Grinding: Progress through finer grits (120 to 600) to smooth the surface.
- Polishing: Use a pitch lap and cerium oxide to polish the surface until it becomes shiny and reflective.
- Figuring: Modify the surface to a parabolic shape using a combination of polishing strokes and testing.
 Testing the Mirror:
The Foucault test is a common method for evaluating the mirror’s shape. It involves observing how light reflects from the mirror and making adjustments based on the shadow patterns observed.
Constructing the Optical Tube Assembly
Once the mirror is complete, you can begin constructing the Optical Tube Assembly (OTA). The OTA must be sturdy, lightproof, and capable of maintaining optical alignment.
Materials:
- Sonotube (concrete form tube), PVC, or aluminum for the tube
- Plywood or aluminum for mirror and secondary supports
- Spider vane for secondary mirror
- Focuser assembly
Assembly Steps:
- Install Primary Mirror Cell: The mirror cell should support the mirror evenly and allow for collimation adjustments.
- Mount Secondary Mirror: Use a spider vane to suspend the secondary mirror at a 45-degree angle.
- Attach Focuser: Mount the focuser opposite the secondary mirror.
- Baffling and Flocking: Line the inside of the tube with non-reflective material to reduce stray light.
Building the Mount
The mount is essential for pointing and stabilizing the telescope. A Dobsonian mount is a popular choice for Newtonian reflectors due to its simplicity and ease of use.
Dobsonian Mount Features:
- Alt-azimuth motion (up/down and left/right)
- Low center of gravity
- Easy to construct from plywood and Teflon pads
Construction Tips:
- Base: A rotating circular base with a central pivot.
- Rocker Box: Holds the tube and allows vertical movement.
- Altitude Bearings: Large semicircular bearings provide smooth motion.
- Balancing: Ensure the tube is balanced to avoid tipping.
Aligning the Optics (Collimation)
Collimation is the process of aligning the optical elements to ensure sharp, accurate images.
Tools:
- Collimation cap or Cheshire eyepiece
- Laser collimator (optional but useful)
Steps:
- Align Secondary Mirror: Ensure it’s centered under the focuser and angled correctly.
- Adjust Primary Mirror: Use the collimation screws to center the reflection.
- Star Test: Point the telescope at a star and slightly defocus to check alignment.
Regular collimation is necessary, especially after transporting the telescope.
First Light and Observing Tips
After collimation, your telescope is ready for “first light”—your first look at the night sky through your homemade instrument. Start with easy targets like the Moon, Jupiter, or Orion’s Nebula.
Observing Tips:
- Allow the telescope to cool to ambient temperature.
- Use low magnification for wide-field views.
- Gradually increase magnification for detailed observations.
- Keep optics clean and protected.
Conclusion
Building a Newtonian reflector telescope is an immensely satisfying project that deepens your understanding of optics, astronomy, and craftsmanship. While it requires patience and precision, the result is a custom-built instrument tailored to your observing needs. Beyond the finished product, the process itself offers a deeper appreciation for the universe and your own creative potential. Whether you’re grinding your first mirror or optimizing your third OTA, the journey of amateur telescope making is as vast and rewarding as the cosmos itself.