Most often, Windows installs its updates when you try to shut down your computer, which is quite understandably inconvenient for most users. So, is there a way to disable Windows 10 updates permanently? This article answers your question.
Although these updates are crucial for your computer, you can run out of patience over time because they take up a large amount of the computer’s processing power and bring certain issues.
Hence, in case you’re tired of the automatic updates, we will guide you through the process of turning them off in seven different ways. Keep on reading.
- Disable Windows Update Service
- Change the Group Policy
- Change the Registry to Stop Windows Update
- Disable Windows Update Tasks
- Meter Network Connection
- Pause Windows Update for 35 Days
- Restore Windows 10 to the Previous Version
Method 1. Disable Windows Update Service
In order to stop automatic updates, you can try to disable Windows update service. Just follow these steps.
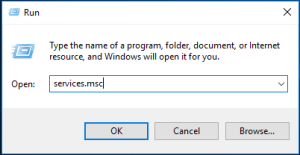
Step 1: Go to the Service window
-
- to open the Run dialog press Windows key and R key together.
- in the boy type msc.
- Click OK to continue.
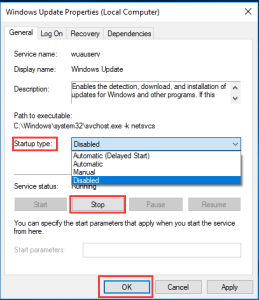
Step 2: Disable Windows Update service
-
-
- double-click the Windows Update service In the services window.
- You will see a popup window. change the Startup type to Disabled. Then change the Service status to Stop.
- Click Apply and OK to execute the changes.
-
Restart your computer once you have finished following these steps.
Method 2: Change the Group Policy
You can also try to change the group policy using the following steps.
Step 1: Lunch the Local Group Policy Editor
-
- Press Windows and R key at the same time to Launch the Run dialog, Then type gpedit. msc.
- Select OK to continue.

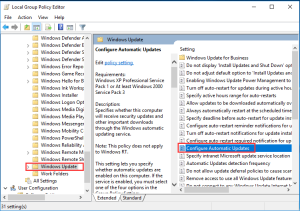
Step 2: Find out the Configure Automatic Updates
-
-
- In the left Side of Local Group Policy Editor window, navigate to the Windows Update folder according to this path: Computer Configuration > Administrator Templates > Windows Components > Windows Update.
- Then Select Configure Automatic Updates in the right panel.
-
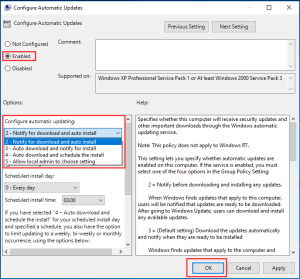
Step 3: Configure automatic updates
-
- choose Enabled to continue in the popup window.
- After that, select Notify for download. in the Configure automatic updating section, auto install from the drop-down menu.
- Select OK And continue.
Reboot your computer after finishing the steps.
Method 3. Change the Registry to Stop Windows Update
The 3rd way is by trying to disable Windows 10 update registry. However, do note that doing this Has its own risk and it may give rise to adverse problems. Hence it is a good choice to create a system backup. You can try to professional Windows backup software MiniTool ShadowMaker.
Here are the steps.
Step 1: Launch the Registry Editor
-
- Press Windows and R key At the same time to Go to the Run dialog.
- Type regedit in the box and click OK.
Step 2: Find out Windows folder
Navigate to the Windows folder Using the following path:
HKEY_LOCAL_MACHINE\SOFTWARE\Policies\Microsoft\Windows

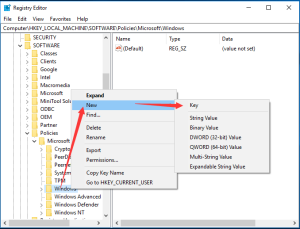
Step 3: Make the new AU key
-
- Right-click Windows key and choose New, and select Key to continue.
- Press Enter to continue.
- Name the new key as AU.
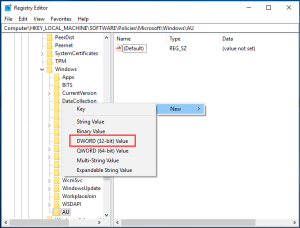
Step 4: Create the AUOptions
-
- Select the newly create AU key and right-click the right blank area to choose New to continue.
- Choose DWORD (32-bit) Value.
- Name it as the AUOptions and press Enter to continue.
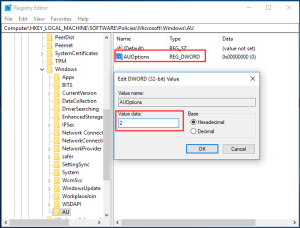
Step 5: Change Value
-
- Double-click the newly created AUOptions.
- In the popup window, change its value data from 0 to 2.
- Click OK to continue.
Restart your computer for the process to take effect.
Solution 4. Disable Windows Update Tasks
You can also try disabling Windows update tasks in the task scheduler.
Step 1: Navigate to Windows Update in Task Scheduler
-
- In the window search box, type task scheduler, and choose the best-matched option.
- Launch the Task Scheduler And enter its main interface.
- Go to the WindowsUpdate folder Using the path: Task Scheduler Library > Microsoft > Windows > WindowsUpdate.
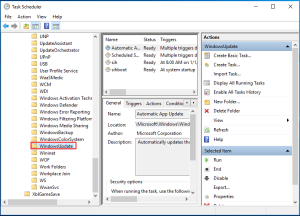
Step 2: Disable Windows Update
-
- Right-click the Scheduled Start in the right panel.
- choose Disable to continue.
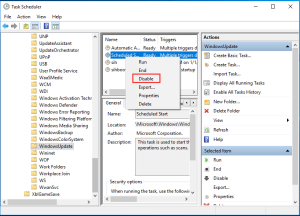
you May close the Task Scheduler window. you have successfully stopped the Windows 10 update.
Solution 5. Meter Network Connection
You can also try to meet are your network connection, but do note that this method would work only on the Wi-Fi connection.
Step 1: Choose the Network & Internet
-
- Right-click the Start button of Windows 10 and select Settings.
- In the popup window That is shown, choose the Network & Internet.
Step 2: Meter your network connection
-
- You’ll see another popup window. choose Status from the left side to continue.
- Choose Change Connection Properties.
- Then turn on Set as a metered connection under the Metered connection section.
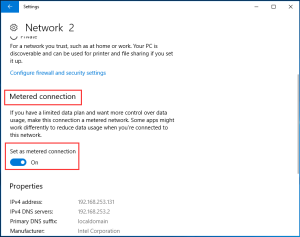
Since the Windows 10 update requires a massive network connection this way can work to disable it.
Solution 6. Pause Windows Update for 35 Days
You can also try pausing the Windows update for 35 days. Here is how to do it.
Step 1: Open Update & Security
-
- Right-click the Start button of Windows 10 and Select Settings.
- In the popup window That is shown, choose Update & Security to continue.
Step 2: Pause Windows Update for 35 days
-
- In the popup window, navigate to the Windows Update on the left side and choose Advanced Options on the right side to continue.
- In the popup window shown again, Go to the Pause Updates section and turn on the Toggle.
Once you reach 35 days, you will have to install the latest updates before you can pause updates again.
Solution 7: Restore Windows 10 to the Previous Version
The last but not the least solution is to go back to the previous version with the backup image. However, you must create a system image in advance. This way, you can go back to the previous version with the backup image even though your computer has been updated to the latest version.
Useful Suggestion
In this article on how to stop windows 10 updates, you must’ve noticed that it has been mentioned over and over again that it is important to take a system back up image since it can help you keep your data safe.